ԭ��js����ֲ�ͼ��ʾ������
����ʱ�䣺2023-04-03 ��Դ������վ������������������������
[ժҪ]�ܶ���վ�϶����ֲ�ͼ�� ��ȴ�����ҵ�һ��ϵͳ����ģ� ���������һ���Ľ��ܣ� ϣ����Ҷ��������ջ� �������Щ����ȷ�ĵط��� ϣ����ҿ���ָ���� ԭ������һЩͼƬ��һ����ƽ�̣� Ȼ�����ƫ��...
�ܶ���վ�϶����ֲ�ͼ�� ��ȴ�����ҵ�һ��ϵͳ����ģ� ���������һ���Ľ��ܣ� ϣ����Ҷ��������ջ� �������Щ����ȷ�ĵط��� ϣ����ҿ���ָ����
ԭ����
��һЩͼƬ��һ����ƽ�̣� Ȼ�����ƫ���������ö�ʱ��ʵ�ֶ�ʱ�ֲ���
����һ������html��������
������ʾ��
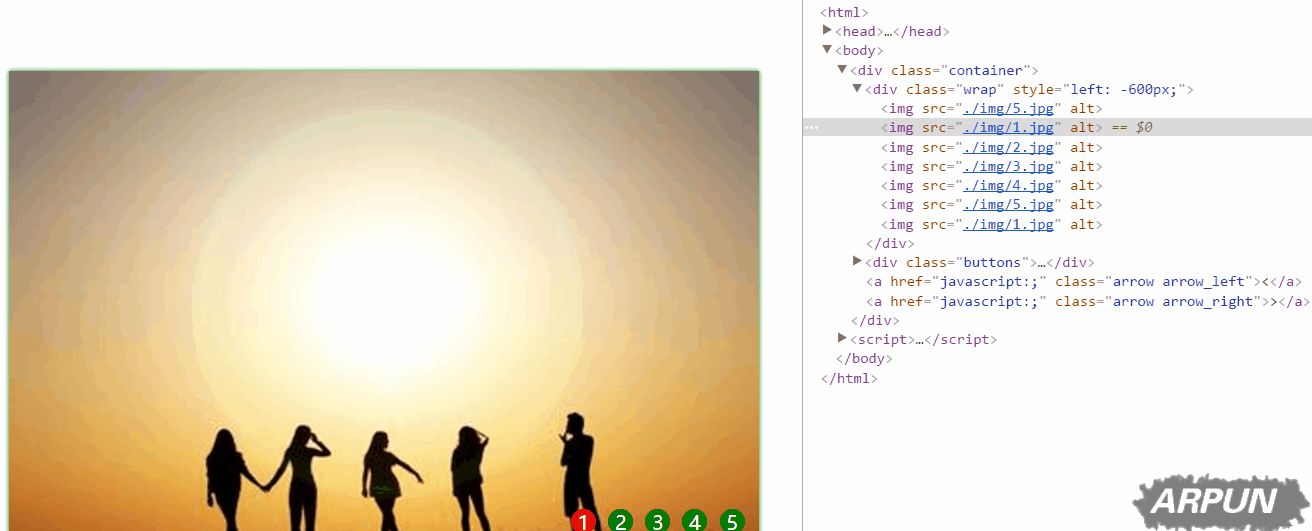
<!DOCTYPE html><html><head> <meta charset="UTF-8"> <title>�ֲ�ͼ</title></head><body> <div class="container"> <div class="wrap" style="left:-600px;"> <img class='lazy' data-original="./img/5.jpg" alt=""> <img class='lazy' data-original="./img/1.jpg" alt=""> <img class='lazy' data-original="./img/2.jpg" alt=""> <img class='lazy' data-original="./img/3.jpg" alt=""> <img class='lazy' data-original="./img/4.jpg" alt=""> <img class='lazy' data-original="./img/5.jpg" alt=""> <img class='lazy' data-original="./img/1.jpg" alt=""> </div> <div class="buttons"> <span>1</span> <span>2</span> <span>3</span> <span>4</span> <span>5</span> </div> <a href="javascript:;" rel="external nofollow" rel="external nofollow" rel="external nofollow" rel="external nofollow" class="arrow_left"><</a> <a href="javascript:;" rel="external nofollow" rel="external nofollow" rel="external nofollow" rel="external nofollow" class="arrow_right">></a> </div></body></html>
ֻ������ͼƬ�� ȴʹ��7�����ֲ��� ����Ϊ��ʵ�����ֲ��� �������ϸ���ܡ�
��5��span�� �����ǿ���ʵʱ�����ֲ�ͼĿǰ������λ�á�
�����������ť�� ����ͨ����������ǰ������ˡ�
����������Ҫ��wrapʹ�þ��Զ�λ�� ������left:-600px;����һ��ͼƬ��ʾ������
������� css����
���ȣ� resetcss�� ������ʾ��
* { margin:0; padding:0; } a{ text-decoration: none; }���ţ� ����Ϊ����ͼƬֻ��container�У� ������Ҫ������Ⱥ߶Ȳ���ʹ��overflow:hidden���������ͼƬ���������� ��������ϣ��wrap�����container�����ƶ��� ��������Ϊrelative�� ���£�
.container { position: relative; width: 600px; height: 400px; margin:100px auto 0 auto; box-shadow: 0 0 5px green; overflow: hidden; } ��������wrap�Ǿ��Զ�λ�ģ� ����,���ǾͿ���ͨ������Left��Right������ͼƬ���ƶ��ˡ� ����z-index:1;�ԶԺ��潫Ҫ���õ�buttons��Ϊ�ο��� ��Ϊ��������ͼƬ�� ����widthΪ4200px��ÿ��ͼƬ��������Ϊ600X400��,����ֻ����ͼƬ������ʵ��ռ��һ���ˡ�
.wrap { position: absolute; width: 4200px; height: 400px; z-index: 1; }Ȼ�����ǰ�ͼƬ����λ���� �������С�� ������ʾ��
.container .wrap img { float: left; width: 600px; height: 400px; }���ڵ�Ч�����£�
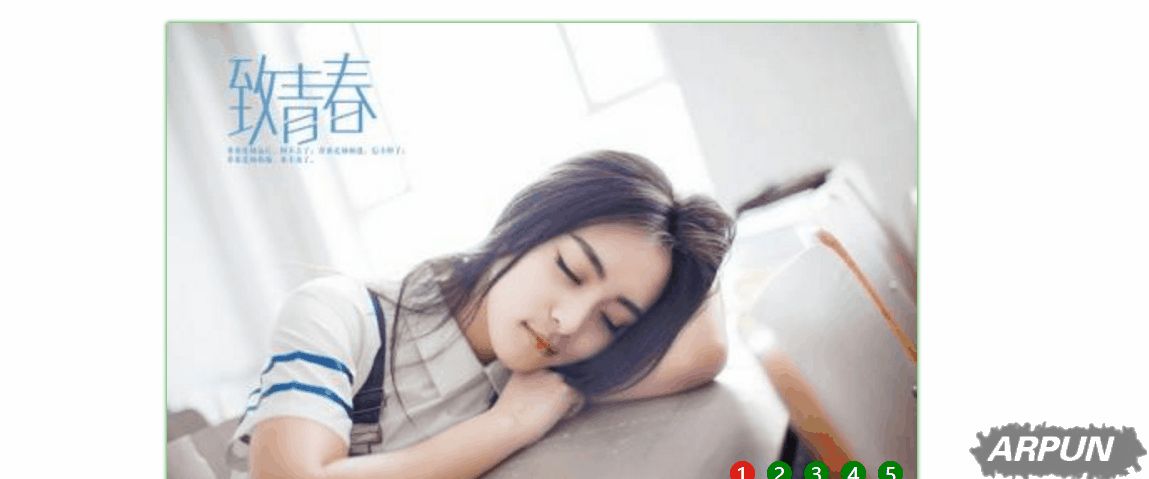
����ʱ�Ѿ���ʾ���˵�һ��ͼƬ�� ���ҳ���������container(container����box-shadow��);
Ȼ�����ǰ���ʾ�����buttons����ͼƬ�����½ǡ� ��������z-index:2;�Ա�֤buttons����ͼƬ������ġ�
.container .buttons { position: absolute; right: 150px; bottom:20px; width: 100px; height: 10px; z-index: 2; }Ȼ��buttons�����span��һ�������Σ� ���Ҹ���ͼƬ��Ӧ��span����һ��on�࣬ ���£�
.container .buttons span { margin-left: 5px; display: inline-block; width: 20px; height: 20px; border-radius: 50%; background-color: green; text-align: center; color:white; cursor: pointer; } .container .buttons span.on{ background-color: red; }�������� ���ǰ������л��ļ�ͷ���ϣ� Ȼ���������Σ� ע�⣺��Ϊ����ʹ��ʵ������ʾ���Ҽ�ͷ�� ��������font-size���ܸı����С��
.container .arrow { position: absolute; top: 35%; color: green; padding:0px 14px; border-radius: 50%; font-size: 50px; z-index: 2; display: none; } .container .arrow_left { left: 10px; } .container .arrow_right { right: 10px; } .container:hover .arrow { display: block; } .container .arrow:hover { background-color: rgba(0,0,0,0.2); }������������js��
�������Ȼ�ȡ�� wrap����ΪҪ������left���ܿ����ֲ�ͼ���� Ȼ���ȡ������������ͷ�� ��ʵ���ֶ��ֲ��� ���£�
var wrap = document.querySelector(".wrap"); var next = document.querySelector(".arrow_right"); var prev = document.querySelector(".arrow_left"); next.onclick = function () { next_pic(); } prev.onclick = function () { prev_pic(); } function next_pic () { var newLeft = parseInt(wrap.style.left)-600; wrap.style.left = newLeft + "px"; } function prev_pic () { var newLeft = parseInt(wrap.style.left)+600; wrap.style.left = newLeft + "px"; }ֵ��ע����ǣ� ����wrap.style.left��һ���ַ����� ����Ҫת��Ϊ���ֲ��ܽ��м��㣬 ���趨leftʱ��Ҫ����px��Ϊһ���ַ����ˡ�
��������������һ�£�
���Կ����� �ڵ�һҳʱ�� leftֵΪ-600�� �������ǿ��Ե��һ����һ�ţ� ���ǵ��ٵ��һ��ʱ�� �ͳ����˿հס� ͬ���ģ� ��һ�ŵ���� ��-3600�����һ�ţ� �Ͳ����ټ�������ˡ� ����
Ҳ����˵�� �����ǵ����һ�ŵ�-3600px�����ǵ�һ��ͼƬ��ʱ�� ������Ҫ�´���ת���ڶ��ţ� ��-1200px����������������ת��
ͬ���� �����ǵ����һ�ŵ�0px�����ǵ�����ͼƬʱ���� ����ϣ���´���ת�������ţ� ��-2400px��
����������˼·�������½�next_pic��prev_pic���������£�
function next_pic () { var newLeft; if(wrap.style.left === "-3600px"){ newLeft = -1200; }else{ newLeft = parseInt(wrap.style.left)-600; } wrap.style.left = newLeft + "px"; } function prev_pic () { var newLeft; if(wrap.style.left === "0px"){ newLeft = -2400; }else{ newLeft = parseInt(wrap.style.left)+600; } wrap.style.left = newLeft + "px"; }��ʱ�� ���ǾͿ��Է���ͼƬ����ѭ�������ˣ�
���ǣ� ��ʱ���ǽ���ʱ�ֶ�ѭ�����ŵģ� �������ϣ���Զ����ţ� ʹ��setInterval()���ɣ� ������ʾ��
var timer = null; function autoPlay () { timer = setInterval(function () { next_pic(); },1000); } autoPlay();�����趨һ����ʱ���� Ȼ��һ�������Զ����ŵĺ����� ����������������ɡ� �������Ϳ����Զ������ˣ� Ч�����£�
 ����
����
�������������Ҫ��ϸ������һ��ͼƬ��ʱ�� ����ϣ���ֲ�ͼֹͣ���ţ� ֻҪclearInterval()���ɣ� ���£�
var container = document.querySelector(".container"); container.onmouseenter = function () { clearInterval(timer); } container.onmouseleave = function () { autoPlay(); }���ڣ� ֻҪ���ǰ���������ֲ�ͼ�У� ��ʱ�ֲ�ͼ�Ͳ��Ქ���ˡ� ���ƿ����֮�� �ֲ�ͼ�Զ����š�
���ǵ�ĿǰΪֹ�� �ֲ�ͼ�·���СԲ�㻹û�ж��� �������Ǿ�ʵ������
ԭ���ܼ� ������buttons��index��ʼֵΪ0�� ����һ��span��classΪon�� Ȼ��next_pic����ʱ�� index��1�� ������prev_pic����ʱ�� inex��1�� �����õ�ǰindex��СԲ���classΪon�� ���Ҫ��index��������Ϊȫ�ֱ����� ���ܱ�֤����ÿһ���������������С�
����showCurrentDot������
var index = 0; var dots = document.getElementsByTagName("span"); function showCurrentDot () { for(var i = 0, len = dots.length; i < len; i++){ dots[i].className = ""; } dots[index].className = "on"; }��next_pic�����Ӵ��룺
index++; if(index > 4){ index = 0; }��prev_pic�����Ӵ���
index--; if(index < 0){ index = 4; } showCurrentDot();������ �ֲ�ͼ�Ϳ����Զ��л��� ����СԲ��Ҳ������ͼƬ�ı仯���仯�ˡ�
���ǣ� ��������Ǿ����������ֲ�ͼ����һ������ - - - �����СԲ��ʱ�� �Ϳ���ת����ӦͼƬ�� ʵ��ԭ������ ���СԲ�㣬 ��ʹwrap��Left�����Ӧ��ֵ�� �������£�
for (var i = 0, len = dots.length; i < len; i++){ (function(i){ dots[i].onclick = function () { var dis = index - i; if(index == 4 && parseInt(wrap.style.left)!==-3000){ dis = dis - 5; } //��ʹ��prev��next��ͬ�� ���ʼ����Ƭ5�����յ���Ƭ1��ʹ��ʱ��������⣬ ���·��ź�λ���ij����� ����Ӧ�ش������� if(index == 0 && parseInt(wrap.style.left)!== -600){ dis = 5 + dis; } wrap.style.left = (parseInt(wrap.style.left) + dis * 600)+"px"; index = i; showCurrentDot(); } })(i); }ԭ�����ǵ������СԲ��ʱ�� �õ���Ӧ��iֵ�� ���iֵҲ����span��indexֵ�� ����������ȫ�ֱ���index���Ƚϣ� Ȼ����������wrap.style.left��ֵ�� Ȼ���iֵ���Ƹ�ȫ�ֱ���index�� �����ʾ��ǰ��Сԭ�㼴�ɡ� ֵ��ע����ǣ������漰���˱հ��ĸ�� ���ֱ��ʹ��forѭ���� ���ܵõ���ȷ�Ľ����
����Ч����ͼ��
 ��
��
���մ���������ʾ��
<!DOCTYPE html><html><head> <meta charset="UTF-8"> <title>�ֲ�ͼ</title> <style> * { margin:0; padding:0; } a{ text-decoration: none; } .container { position: relative; width: 600px; height: 400px; margin:100px auto 0 auto; box-shadow: 0 0 5px green; overflow: hidden; } .container .wrap { position: absolute; width: 4200px; height: 400px; z-index: 1; } .container .wrap img { float: left; width: 600px; height: 400px; } .container .buttons { position: absolute; right: 5px; bottom:40px; width: 150px; height: 10px; z-index: 2; } .container .buttons span { margin-left: 5px; display: inline-block; width: 20px; height: 20px; border-radius: 50%; background-color: green; text-align: center; color:white; cursor: pointer; } .container .buttons span.on{ background-color: red; } .container .arrow { position: absolute; top: 35%; color: green; padding:0px 14px; border-radius: 50%; font-size: 50px; z-index: 2; display: none; } .container .arrow_left { left: 10px; } .container .arrow_right { right: 10px; } .container:hover .arrow { display: block; } .container .arrow:hover { background-color: rgba(0,0,0,0.2); } </style></head><body> <div class="container"> <div class="wrap" style="left: -600px;"> <img class='lazy' data-original="./img/5.jpg" alt=""> <img class='lazy' data-original="./img/1.jpg" alt=""> <img class='lazy' data-original="./img/2.jpg" alt=""> <img class='lazy' data-original="./img/3.jpg" alt=""> <img class='lazy' data-original="./img/4.jpg" alt=""> <img class='lazy' data-original="./img/5.jpg" alt=""> <img class='lazy' data-original="./img/1.jpg" alt=""> </div> <div class="buttons"> <span class="on">1</span> <span>2</span> <span>3</span> <span>4</span> <span>5</span> </div> <a href="javascript:;" rel="external nofollow" rel="external nofollow" rel="external nofollow" rel="external nofollow" class="arrow arrow_left"><</a> <a href="javascript:;" rel="external nofollow" rel="external nofollow" rel="external nofollow" rel="external nofollow" class="arrow arrow_right">></a> </div> <script> var wrap = document.querySelector(".wrap"); var next = document.querySelector(".arrow_right"); var prev = document.querySelector(".arrow_left"); next.onclick = function () { next_pic(); } prev.onclick = function () { prev_pic(); } function next_pic () { index++; if(index > 4){ index = 0; } showCurrentDot(); var newLeft; if(wrap.style.left === "-3600px"){ newLeft = -1200; }else{ newLeft = parseInt(wrap.style.left)-600; } wrap.style.left = newLeft + "px"; } function prev_pic () { index--; if(index < 0){ index = 4; } showCurrentDot(); var newLeft; if(wrap.style.left === "0px"){ newLeft = -2400; }else{ newLeft = parseInt(wrap.style.left)+600; } wrap.style.left = newLeft + "px"; } var timer = null; function autoPlay () { timer = setInterval(function () { next_pic(); },2000); } autoPlay(); var container = document.querySelector(".container"); container.onmouseenter = function () { clearInterval(timer); } container.onmouseleave = function () { autoPlay(); } var index = 0; var dots = document.getElementsByTagName("span"); function showCurrentDot () { for(var i = 0, len = dots.length; i < len; i++){ dots[i].className = ""; } dots[index].className = "on"; } for (var i = 0, len = dots.length; i < len; i++){ (function(i){ dots[i].onclick = function () { var dis = index - i; if(index == 4 && parseInt(wrap.style.left)!==-3000){ dis = dis - 5; } //��ʹ��prev��next��ͬ�� ���ʼ����Ƭ5�����յ���Ƭ1��ʹ��ʱ��������⣬ ���·��ź�λ���ij����� ����Ӧ�ش������� if(index == 0 && parseInt(wrap.style.left)!== -600){ dis = 5 + dis; } wrap.style.left = (parseInt(wrap.style.left) + dis * 600)+"px"; index = i; showCurrentDot(); } })(i); } </script></body></html> �ܽ
ʵ��һ���ֲ�ͼ���Dz��ѵģ� ����˼·�� �ȴ���һ��div�� ������Ⱥ߶ȣ� overflow��hidden�� Ȼ��һ��װͼƬ��div�� ����Ϊ����ͼƬ���ܿ��ȣ� ����ʹ�両���� �������е�ͼƬ�ʹ���һ���С� Ȼ��Ϊ��ʵ��������� ������Ҫ����β�ֱ�����һ�Ź���ͼƬ�� ������������ť�� ʹ������ֶ��ֲ��� Ȼ��ֻ��Ҫ����һ����ʱ��ʹ�䳯һ�������Զ��ֲ����ɣ� ��Ϊ�û���ʱ��Ҫ�鿴���飬 ���Ե�������ʱ��clear��ʱ���� �����ٶ�ʱ���š� Ϊ�˸��õ��û����飬 ����������������һ��СԲ�㣬 �û����������֪������������λ�ã� ��� ���ñհ�ʹ���û�����ֱ��ͨ�����СԲ���л�ͼƬ��
��վ������һ�������������������ͬ�ļ��ܺ�ѧ������ʹ�õ�������ά������վ��
